
AWS S3 Vector Search End-to-End Guide
Why Vector Databases Were Created The rise of AI and machine learning has fundamentally changed how we process and understand data. Traditional databases excel at storing structured data like names, numbers, and categories, but they struggle with the complexity of modern AI applications that need to understand: The AI Data Challenge Modern AI systems convert unstructured data (text, images, audio) into vector embeddings – numerical representations that capture semantic meaning. For example: Mathematical Foundation Vector databases solve the Approximate Nearest Neighbor (ANN) problem: What is a Vector Database? A vector database is a specialized database designed to store, index, and query high-dimensional vector embeddings efficiently. Unlike traditional databases that store discrete values, vector databases store continuous numerical representations of data that capture semantic meaning and relationships. Core Components Traditional Database vs Vector Database Example: Understanding Vector Similarity When to Use Vector Databases Perfect for: Not ideal for: Overview Amazon S3 Vectors integrates with OpenSearch to provide flexible vector storage and search capabilities, offering up to 90% cost reduction compared to conventional approaches while seamlessly integrating with Amazon Bedrock Knowledge Bases, SageMaker, and OpenSearch for AI applications. What’s New and Important Amazon S3 Vectors is a new cloud object store that provides native support for storing and querying vectors at massive scale, offering up to 90% cost reduction compared to conventional approaches while seamlessly integrating with Amazon Bedrock Knowledge Bases, SageMaker, and OpenSearch for AI applications. Amazon OpenSearch Serverless now supports half (0.5) OpenSearch Compute Units (OCUs) for indexing and search workloads, cutting the entry cost in half. Architecture Options Option 1: S3 Vectors + OpenSearch Serverless (Recommended) Option 2: OpenSearch Serverless Only Prerequisites: Part 1: Setting Up S3 Vectors 1.1 Create S3 Vectors Bucket 1.2 Upload Vector Data # upload_vectors.pyimport boto3import numpy as npimport json def upload_vectors_to_s3(): s3_client = boto3.client(‘s3’) bucket_name = ‘my-vector-bucket-2024’ # Sample vector data (768-dimensional vectors) vectors = [ { “id”: “doc_1”, “vector”: np.random.rand(768).tolist(), “metadata”: { “title”: “Document 1”, “category”: “technology”, “content”: “AI and machine learning concepts” } }, { “id”: “doc_2”, “vector”: np.random.rand(768).tolist(), “metadata”: { “title”: “Document 2”, “category”: “science”, “content”: “Physics and quantum mechanics” } } ] # Upload vectors for i, vector_data in enumerate(vectors): key = f”vectors/{vector_data[‘id’]}.json” s3_client.put_object( Bucket=bucket_name, Key=key, Body=json.dumps(vector_data), ContentType=’application/json’ ) print(f”Uploaded vector {vector_data[‘id’]}”) if __name__ == “__main__”: upload_vectors_to_s3() Part 2: Setting Up OpenSearch Serverless 2.1 Create OpenSearch Serverless Collection # Create security policyaws opensearchserverless create-security-policy \ –name vector-search-policy \ –type encryption \ –policy ‘{ “Rules”: [ { “ResourceType”: “collection”, “Resource”: [“collection/vector-search-*”] } ], “AWSOwnedKey”: true }’ # Create network policyaws opensearchserverless create-security-policy \ –name vector-search-network-policy \ –type network \ –policy ‘[ { “Rules”: [ { “ResourceType”: “collection”, “Resource”: [“collection/vector-search-*”] }, { “ResourceType”: “dashboard”, “Resource”: [“collection/vector-search-*”] } ], “AllowFromPublic”: true } ]’ # Create access policyaws opensearchserverless create-access-policy \ –name vector-search-access-policy \ –type data \ –policy ‘[ { “Rules”: [ { “ResourceType”: “collection”, “Resource”: [“collection/vector-search-*”], “Permission”: [“aoss:*”] }, { “ResourceType”: “index”, “Resource”: [“index/vector-search-*/*”], “Permission”: [“aoss:*”] } ], “Principal”: [“arn:aws:iam::YOUR_ACCOUNT_ID:root”] } ]’ # Create the collectionaws opensearchserverless create-collection \ –name vector-search-collection \ –type VECTORSEARCH \ –description “Vector search collection for embeddings” 2.2 Create Vector Index # create_index.pyfrom opensearchpy import OpenSearch, RequestsHttpConnectionfrom aws_requests_auth.aws_auth import AWSRequestsAuthimport boto3def create_vector_index(): # Get credentials credentials = boto3.Session().get_credentials() awsauth = AWSRequestsAuth(credentials, ‘us-east-1’, ‘aoss’) # OpenSearch client client = OpenSearch( hosts=[{‘host’: ‘your-collection-endpoint.us-east-1.aoss.amazonaws.com’, ‘port’: 443}], http_auth=awsauth, use_ssl=True, verify_certs=True, connection_class=RequestsHttpConnection ) # Create index with vector mapping index_name = “vector-search-index” index_body = { “settings”: { “index”: { “knn”: True, “knn.algo_param.ef_search”: 100
Understanding bash vs dash — What Every DevOps Engineer Should Know

When writing shell scripts or running automation tools like Ansible, you’ll often see /bin/sh, /bin/bash, or even errors like: This confusion stems from differences between bash and dash — two popular Unix shells. Let’s explore what they are, how they differ, and when it matters. What is bash ? Bash stands for Bourne Again Shell. It’s: Key Features of Bash: What is dash ? dash stands for Debian Almquist Shell. It’s: What dash lacks: bash vs dash: A Side-by-Side Feature bash dash POSIX compliant Mostly Fully Arrays Yes No [[ … ]] Yes No set -o pipefail Yes No Brace expansion ( {1..5} ) Yes No Speed Slower Faster Installed by default Most distros Debian/Ubuntu Example That Works in Bash but Fails in Dash This will fail in dash (/bin/sh on Ubuntu) with: It works fine in bash. Why This Matters in DevOps & Ansible ? In tools like Ansible, the shell module runs commands via /bin/sh by default. On Ubuntu/Debian systems, /bin/sh → dash, which means: How to Switch /bin/sh to Bash (if needed) This will update /bin/sh → /bin/bash. Best Practices #ansible #skillupwithsachin #blogs #bash #dash Youtube: https://www.youtube.com/@skillupwithsachin
Connecting a Flask Application to AWS RDS (MySQL)
Project Description Amazon Web Services (AWS) provides a managed SQL database service called Amazon Relational Database Service (Amazon RDS). Amazon RDS uses various database engines to manage the data, migrations, backup, and recovery. In this project, we will create a database instance of SQL over RDS. After that, we will create a key pair value, use a security group and make an EC2 instance using Amazon Machine Image (AMI). Then, we’ll use the endpoint of that database to connect it with the EC2 instance and install the required packages for the Flask application. In the end, we’ll deploy the Flask application on EC2 and connect the application to use the AWS RDS (MySQL) database. The AWS Command Line Interface (CLI) is a powerful utility to manage all AWS services through a shell prompt. You can use the CLI to access and configure various AWS services and automate tasks using scripts. For your convenience, the AWS CLI has been downloaded and installed using the official link Verify that the utility is properly configured by running the following command: When you’ve successfully run this command, you’ll see the version details of the AWS CLI. This ensures that the AWS CLI has been installed correctly. Use the following command to list all commands available through the AWS CLI: Press the “Q” key to exit and return to the shell prompt. Note: In this project, you’ll create and export some environment variables using the environment.sh bash script. Step 2: Configuration: To configure the AWS account, run the configure command available through the AWS CLI and enter credentials, region, and output format. A few sample regions available in the AWS CLI are listed in the following table: Region Name Region US East (Ohio) us-east-2 US East (N. Virginia) us-east-1 US West (N. California) us-west-1 Some sample output formats available through AWS CLI are shown below: Note: It’s recommended to create a new AWS AccessKeyId and SecretAccessKey by creating a new IAM User for this project. To learn how to generate these keys, follow this link. Make sure to set up the AmazonEC2FullAccess user policy for the IAM user. Type the following command in the terminal: After executing this command, add the following parameters: Step 3: Create a New RDS Amazon Web Services (AWS) provides managed SQL database services the called Amazon Relational Database Service (Amazon RDS). Amazon RDS provides various database engines to manage the data, migrations, backup, and recovery. Let’s create a new database using the aws rds command. Add the following parameters while creating a new RDS: After creating the RDS instance, assign the value of VpcSecurityGroups.VpcSecurityGroupId to the SG_ID variable in the environment.sh file. After adding the value to the file, use the following command to export the value: source environment.sh Step 4 : Describe DB Instances Use the aws rds command to list all DB instances associated with the AWS account. After describing the RDS instance, assign the value of Endpoint.Address to the RDS_ADDRESS variable in the environment.sh file. Note: The endpoint may take some time to show up because instances created in the previous task will take some time to be initialized. Run the following: source environment.sh Step 5: Add a New Inbound Rule to the Security Groups The security group has some default inbound and outbound rules. MySQL that will be running on port 3306. The inbound rule will specify the port number and IP range of the incoming traffic that the EC2 security group will allow. Add an inbound rule to the security group with the following parameters: Add two more inbound rules to access the EC2 with SSH and the Flask application. Use a command from aws ec2 to add these three inbound rules to the security group. Type the following command to add an inbound rule for Flask: Type the following command to add an inbound rule for SSH: Step 6: Create a New Key Pair In AWS, a key pair is a combination of public and private keys. The public key is encrypts data, while the private key decrypts data. These are the security credentials used to connect to the EC2 instance. Amazon EC2 instance stores the public key, and the user has their private key to connect to the instance. Let’s create a new key pair in the account using the aws ec2 command. You need to pass a key name to the command to create a key pair. The name of the key pair must be unique. Step 7: List all Key Pairs Let’s verify the creation of key pairs by listing all available key pairs in the account using the aws ec2 command. Step 8: Run an EC2 Instance Let’s launch a template using Amazon Machine Image (AMI) in this task. You can only launch instances of those AMIs for which you have permission. To launch an instance, get the AMI ID of the required operating system. Add the AMI ID in the AMI_ID variable in the environment.sh file. Use the following command to export the value: source environment.sh After getting Amazon Ubuntu’s AMI ID, use the aws ec2 command and pass these parameters to launch the instance: Type the following command to run an instance: After running the instance, copy the InstanceId from the output and assign it to the INSTANCE_ID variable in the environment.sh file. Use the following command to export the values: Step 9: Check the state of the EC2 instance After running an instance, we can check the state of the instance using the aws ec2 command. This will accept the InstanceId as the argument and output the complete details of the instance. Check the PublicIpAddress and State.name of the instance. If the state is not running, wait for a while and list the attributes of the instance again. After two minutes, notice the status of the instance again. It should be in running now. Note: Copy the PublicIpAddress of the instance and place it in the environment.sh file in the PUBLIC_IP. Next, export the variable using the following command: source environment.sh Step 10: Copy the Data from a Local Machine to EC2 machine: To deploy the Flask application over the EC2 instance, upload the application from a local machine to the EC2 instance. In this task, perform the following steps: GitHUB: https://github.com/skillupwithsachin/aws_rds_project_skill_up_with_sachin.git https://github.com/skillupwithsachin/aws_rds_project_skill_up_with_sachin# Type the following command to change the access permission of the file: Use the following command in the terminal to upload the zipped Flask application: After these commands,
Breaking Down Kubernetes Interviews – One Pod at a Time!

Introduction: Why Container Orchestration? Problem Statement:As microservices-based applications scale, managing containers across multiple environments manually becomes inefficient and error-prone. Solution:Container orchestration automates the deployment, scaling, networking, and lifecycle management of containers. Key Benefits of Kubernetes Orchestration: Virtual Machines vs Containers vs Kubernetes Virtual Machines Docker Containers Kubernetes Hardware-level virtualization OS-level virtualization Container orchestration Heavyweight Lightweight and fast Automates container ops Boot time: Minutes Boot time: Seconds Self-healing, scalable Key Insight:Containers solve the portability problem. Kubernetes solves the scalability and reliability problem of containers in production. Storage in Kubernetes (Dynamic & CSI) Problem Statement:How do we abstract and dynamically provision storage in Kubernetes without being tied to a specific cloud or on-premise provider? Solution: Flow:App → PVC → StorageClass + CSI → PV Reference: https://kubernetes.io/blog/2019/01/15/container-storage-interface-ga/ Kubernetes Architecture Control Plane (Master Node): Together, these components form the master control plane, which acts as the brain and command center of the Kubernetes cluster. Worker Node (Data Plane): Worker nodes, also known as worker machines or worker servers, are the heart of a Kubernetes cluster. They are responsible for running containers and executing the actual workloads of your applications. Architecture Flow Example: Triggers → API Server → Scheduler → Etcd → Node → Kubelet → Container Runtime Instruction Flow (From YAML to Running Pod) PODS Pods are fundamental building blocks in Kubernetes that group one or more containers together and provide a shared environment for them to run within the same network and storage context. Allows you to colocate containers that need to work closely together within the same network namespace. They can communicate using localhost and share the same IP address and port space. Containers within a Pod share the same storage volumes, which allows them to easily exchange data and files. Volumes are attached to the Pod and can be used by any of the containers within it. Kubernetes schedules Pods as the smallest deployable unit. If you want to scale or manage your application, you work with Pod replicas, not individual containers. A Pod can include init containers, which are containers that run before the main application containers. Kubernetes High Availability & Failure Scenarios Component Failure Impact Recovery API Server Cluster becomes unmanageable Restart or HA deployment Etcd State loss, no new scheduling Restore from backup, use HA etcd Scheduler No new pods scheduled Restart scheduler Controller Manager Auto-scaling and replication broken Restart or recover HA Kubelet Node disconnected, unmonitored pods Restart kubelet or reboot node Kube-Proxy Service communication broken Restart kube-proxy CoreDNS DNS lookup failure for services Restart CoreDNS Reference: https://kubernetes.io/docs/setup/production-environment/tools/kubeadm/high-availability/ Kubernetes Services In Kubernetes, Services are a fundamental concept that enables communication and load balancing between different sets of Pods, making your applications easily discover able and resilient. Why Do We Need Kubernetes Services? Types of Services: Cluster IP: The default service type. It provides internal access within the cluster. NodePort: Opens a port (30000–32767) on each node, allowing external access to services. Make sure to configure security groups accordingly. LoadBalancer: Distributes incoming traffic across multiple pods, ensuring high availability and better performance. Ingress: HTTP routing with host/path rules Network Policies (Ingress & Egress) Problem Statement:How do we secure communication between microservices in a Kubernetes cluster? Use Case: 3-Tier Microservice Architecture Ingress Policy: Egress Policy: Secrets & ConfigMaps Resource Purpose Security Level Config Map Store non-sensitive config Plain text in etcd Secret Store Sensitive Data Base-64 encoded, more secure Practical Use Case: Kubernetes CI/CD Integration (Brief Outline) Problem Statement: How do we automate builds, tests, and deployments on Kubernetes? Approach: How to handle CrashLoopBackOff Error ? Error Message: kubectl get podsNAME READY STATUS RESTARTS AGEmy-app-5c78f8d6f5-xyz12 0/1 CrashLoopBackOff 5 3m Cause: Application inside the container is crashing repeatedly.Missing dependencies, incorrect configuration, or resource limitations.Fix: Check logs for error messages: kubectl logs my-app-5c78f8d6f5-xyz12 Describe the pod for more details: kubectl describe pod my-app-5c78f8d6f5-xyz12 Fix application errors or adjust resource limits. How to fix ImagePullBackOff Error ? Error Message: kubectl get podsNAME READY STATUS RESTARTS AGEmy-app-5c78f8d6f5-xyz12 0/1 ImagePullBackOff 0 3m Cause: Fix: kubectl describe pod my-app-5c78f8d6f5-xyz12 containers: – name: my-app image: myregistry.com/my-app:latest kubectl create secret docker-registry regcred \ –docker-server=myregistry.com \ –docker-username=myuser \ –docker-password=mypassword How to fix Pod Stuck in “Pending” State ? Error Message: kubectl get podsNAME READY STATUS RESTARTS AGEmy-app-5c78f8d6f5-xyz12 0/1 Pending 0 5m Cause: Fix: kubectl describe pod my-app-5c78f8d6f5-xyz12 kubectl get nodes kubectl get pvc How to fix Node Not Ready ? Error Message: kubectl get nodesNAME STATUS ROLES AGE VERSIONnode-1 NotReady <none> 50m v1.27.2 Cause: Fix: kubectl describe node node-1 journalctl -u kubelet -n 100 systemctl restart kubelet df -h How to fix Service Not Accessible error? Error Message: curl: (7) Failed to connect to my-service port 80: Connection refused Cause: Fix: kubectl get svc my-service kubectl describe svc my-servic kubectl get pods -o wide How to fix “OOMKilled” (Out of Memory) ? Error Message: kubectl get pod my-app-xyz12 -o jsonpath='{.status.containerStatuses[0].state.terminated.reason}’OOMKilled Cause: Fix: resources: limits: memory: “512Mi” requests: memory: “256Mi” kubectl top pod my-app-xyz12 What do you know about kubeconfig file in Kubernetes ? A file used to configure access to a cluster is called a kubeconfig file. This is the generic way of referring to a configuration file. This doesn’t mean the file name is kubeconfig. K8s components like kubectl, kubelet, or kube-controller-manager use the kubeconfig file to interact with the K8s API. The default location of the kubeconfig file is ~/.kube/config. There are other ways to specify the kubeconfig location, such as the KUBECONFIG environment variable or the kubectl —kubeconfig parameter. The kubeconfig file a YAML file contains groups of clusters, users, and contexts. The clusters section lists all clusters that you already connected. The users section lists all users already used to connect to a cluster. There are some possible keys for the user: The context section links a user and a cluster and can set a default namespace. The context name is arbitrary, but the user and cluster must be predefined in the kubeconfig file. If the namespace doesn’t exist, commands will fail with an error. What are Selectors & Labels in Kubernetes? Services use selectors and labels to identify the Pods they should target.
Understanding Kubernetes Architecture: A Pizza Shop Story

Kubernetes can feel overwhelming at first, with all its components and technical terms. To make it easier, let’s explain it using something we all understand: a pizza shop! In this blog, we’ll break down the architecture of Kubernetes and its components in the simplest way possible by comparing it to the operations of a pizza shop. By the end, you’ll see how Kubernetes works in a way that’s both fun and easy to grasp. he Pizza Shop Analogy Imagine you own a pizza shop. To run your shop successfully, you need a team, processes, and tools to ensure every customer gets their pizza on time and as ordered. Kubernetes works the same way—it’s the system that helps manage and coordinate your “pizza shop” (your applications and containers). Let’s dive into the key components of Kubernetes and how they relate to a pizza shop. 1. The Kitchen: Nodes The kitchen is where all the work happens in your pizza shop. Here, chefs prepare the pizzas based on orders. In Kubernetes, the kitchen represents Nodes. Without the kitchen, there’s no place to make the pizzas (or run your applications). 2. The Manager: Control Plane Every successful pizza shop needs a manager who oversees the entire operation. This manager ensures that orders are taken, resources are allocated, and everything runs smoothly. In Kubernetes, the Control Plane is the manager. The control plane consists of several key components: 3. The Waitstaff: Kubelet The waitstaff in a pizza shop are responsible for delivering orders from the customers to the kitchen and ensuring the prepared pizzas reach the right table. In Kubernetes, this role is played by the Kubelet. Without the kubelet, there’s no one to ensure orders are being processed and delivered. 4. The Menu: API Server Every pizza shop needs a menu that lists all the available options for customers. In Kubernetes, the API Server acts as this menu. Without the API server, customers wouldn’t know what they can order, and the manager wouldn’t know what to deliver. 5. Ingredients and Supplies: Persistent Storage A pizza shop needs a steady supply of ingredients to make pizzas. These ingredients are stored in the inventory. In Kubernetes, this is equivalent to Persistent Storage. 6. The Delivery Team: Services Once the pizzas are ready, they need to be delivered to the right customers. Kubernetes uses Services to handle this. 7. Quality Control: Monitoring and Logging To ensure every pizza meets the shop’s standards, quality control is essential. Kubernetes has built-in tools for Monitoring and Logging that play this role. Putting It All Together In summary, Kubernetes is like a well-run pizza shop with various components working together to deliver a seamless experience. Here’s how it all fits: By understanding Kubernetes through the lens of a pizza shop, its architecture becomes a lot more relatable and easier to grasp. Kubernetes might seem complex at first, but breaking it down into familiar concepts like running a pizza shop makes it much easier to understand. Whether you’re managing a small application or a large-scale system, Kubernetes ensures everything is organized, scalable, and efficient—just like a well-run pizza shop!
Understanding printf in Scripting: Usage, Examples, and Alternatives

When it comes to printing output in programming, printf is one of the most commonly used functions, especially in languages like C, Shell scripting, and Java. Understanding its functionality, capabilities, and alternatives can significantly enhance your coding experience. What is printf? The printf function stands for “print formatted” and is used to print formatted output to the console. It provides a powerful way to display text, numbers, and other data types in a customized format. Primarily, it is a standard library function in C but is also available in shell scripting for Unix/Linux environments. Syntax in Shell Scripts: Unlike echo, which simply prints text, printf provides advanced formatting capabilities. Common Usage and Examples in Shell Scripts Basic Printing The simplest use of printf is to display static text: Note: Unlike echo, you must explicitly include \n for a new line. Printing Variables You can use format specifiers to print variable values: Formatting Numbers printf allows precise control over numerical output: Creating Aligned Tables You can use width specifiers to align output: Output: Using %q in Shell printf The %q specifier in printf escapes special characters in a string, making it useful for safe and predictable output, especially when dealing with untrusted input or special characters. Example: Output: This is particularly helpful in scripts where inputs might include spaces, quotes, or other characters requiring escaping. Combining %q with Other Specifiers: Output: Format Specifiers in Shell printf Here are some common placeholders used in shell scripting with printf: Differences Between printf and echo Alternatives to printf in Shell Scripts While printf is versatile, there are alternatives for simpler tasks: 1. “ The echo command is simpler and often sufficient for basic output. 2. “** for Advanced Formatting** awk can be used for complex text processing and formatting. 3. “** for Static Text** For displaying static text files or strings, cat is an option: When to Use printf in Shell Scripts Scenario-Based Interview Questions and Answers 1. How would you use “ to escape special characters in a user input string? Answer: Use the %q format specifier to ensure that special characters are escaped. This will output: Hello,\ \$USER! 2. How can you format a floating-point number to show exactly three decimal places? Answer: Use %.3f in the format specifier. This will output: 3.142 3. How can you create a table with aligned columns using “? Answer: Use width specifiers to align the text. 4. What happens if a format specifier does not match the argument type? Answer: The output may be unpredictable, as printf does not perform type checking. For example: This could cause an error or display an unintended result. 5. How do you print a literal ** character using **? Answer: Use %% in the format string. This will output: Progress: 50% The printf command is a powerful tool in shell scripting, offering advanced formatting capabilities beyond what echo can provide. Its versatility makes it a go-to choice for scripts that require precision and control over the output format. While simpler alternatives exist, understanding and leveraging printf ensures your shell scripts are robust and professional. Experiment with printf in your shell scripts and discover how it can streamline and enhance your output!
AWS EC2 Status Checks: An Overview
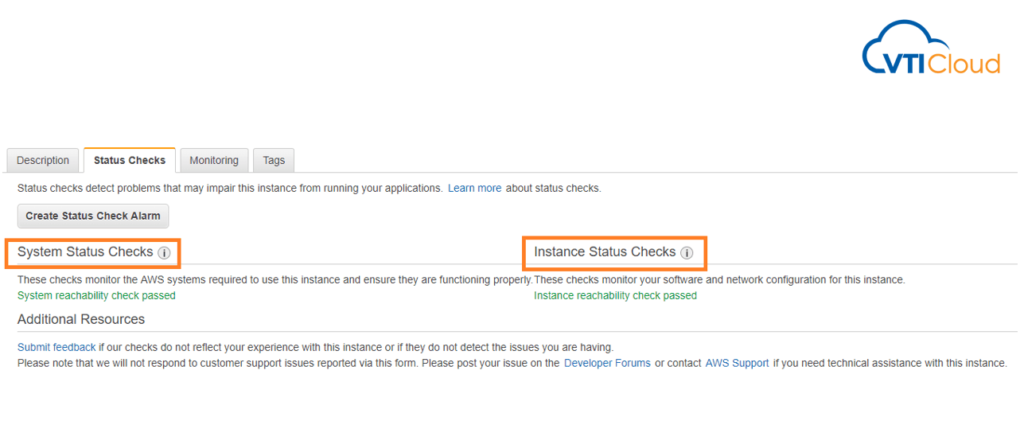
AWS EC2 status checks are automated health checks that monitor the functionality and operability of your EC2 instances. They provide crucial insights into the state of the underlying hardware, network connectivity, and the operating system of the instance. These checks are fundamental to ensure the high availability and reliability of your workloads on AWS. Types of EC2 Status Checks Default Configuration of Status Checks By default, status checks are enabled for every EC2 instance upon launch. These checks are configured and managed by AWS automatically. The results of these checks are visible in the AWS Management Console under the “Status Checks” tab of an EC2 instance, or via the AWS CLI and SDKs. Can We Modify Default Configuration? AWS does not provide options to directly alter the predefined system and instance status checks. However, you can customize the handling of failed checks by configuring CloudWatch Alarms: Defining Custom Health Checks While AWS EC2 status checks focus on the infrastructure and OS-level health, you might need additional monitoring tailored to your application or workload. This is where custom health checks come in. Here’s how to implement custom checks: sudo yum install amazon-cloudwatch-agentsudo vi /opt/aws/amazon-cloudwatch-agent/etc/amazon-cloudwatch-agent.json Example configuration snippet: { “metrics”: { “append_dimensions”: { “InstanceId”: “${aws:InstanceId}” }, “metrics_collected”: { “disk”: { “measurement”: [“used_percent”], “resources”: [“/”] }, “mem”: { “measurement”: [“used_percent”] } } }} Start the cloudwatch agent:sudo /opt/aws/amazon-cloudwatch-agent/bin/amazon-cloudwatch-agent-ctl -a start Example: Status Check Handling Scenario: Automate recovery when a system status check fails. { “Version”: “2012-10-17”, “Statement”: [ { “Effect”: “Allow”, “Action”: [“ec2:RebootInstances”], “Resource”: “*” } ]} 2. Create a CloudWatch alarm: 3. Test: Interview Questions and Answers
Managing Containers Without Kubernetes: A Glimpse Into Challenges and Solutions
Imagine a world without Kubernetes. A world where containers, those lightweight, portable units of software, existed, but their management was a daunting task. Let’s delve into the challenges that developers and operations teams faced before the advent of this powerful tool. A World Without Kubernetes Before Kubernetes, managing containers was a complex and error-prone process. Here are some of the key challenges: Alternatives Without Kubernetes A Real-World Scenario: A Microservices Architecture Consider a typical microservices architecture, where a complex application is broken down into smaller, independent services. Each service is deployed in its own container, offering flexibility and scalability. Without Kubernetes: Kubernetes to the Rescue Kubernetes revolutionized container orchestration by automating many of these tasks. It provides a robust platform for deploying, managing, and scaling containerized applications. The Challenges of Managing Containers Without Kubernetes The absence of Kubernetes would force us to rely on fragmented tools and custom solutions, each addressing a piece of the orchestration puzzle. The challenges of scaling, monitoring, and ensuring reliability would increase operational complexity, delay deployments, and impact developer productivity. Thankfully, Kubernetes exists, empowering us to focus on building applications rather than worrying about infrastructure.
The Dual Edges of Adaptive AI: Navigating Hidden Risks in the Age of Smart Machines
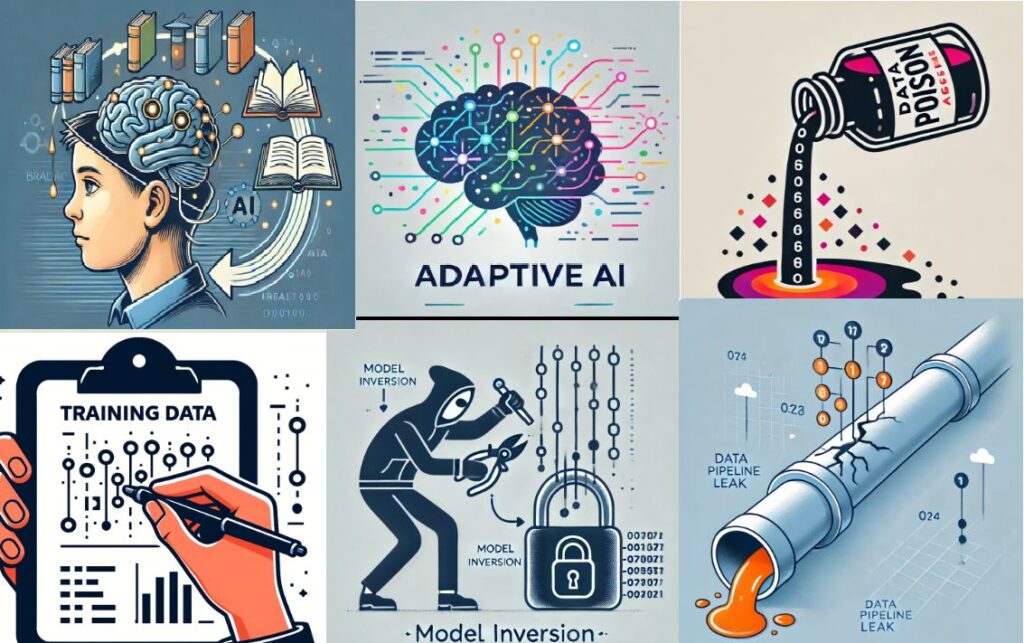
IntroductionAdaptive AI holds tremendous promise—its ability to learn, adjust, and evolve as it encounters new data or scenarios is a leap toward intelligent, responsive technology. However, this continual evolution also brings unique and often hidden risks. As Adaptive AI grows more deeply embedded in our lives and decision-making, we need to understand the shadows it casts, the risks lurking in its complexity, and the implications for data privacy, security, and fairness. 1. Data Leaks: The Cracks in the Pipeline Imagine your personal information as water in a tightly sealed pipe. When a data leak occurs, it’s like a crack in that pipe, allowing private information to escape without your knowledge. In the world of Adaptive AI, where vast amounts of data flow into models to improve learning and accuracy, these leaks can be devastating, potentially exposing passwords, credit card numbers, and other sensitive data to unintended parties. 2. Data Poisoning: Contaminating the Learning Pool Picture a serene lake from which an AI learns, gathering information and forming decisions based on what it finds in the water. Data poisoning is the equivalent of someone secretly dumping toxic waste into that lake. When Adaptive AI trains on contaminated or intentionally misleading data, it results in incorrect conclusions or harmful behaviors, just as drinking poisoned water could make one sick. This malicious tampering can skew outcomes, leading to decisions that may harm individuals, businesses, or entire systems. 3. Training Data Manipulation: Misinforming the Mind Consider a textbook deliberately altered by a teacher, giving incorrect answers to certain questions. When an AI model learns from manipulated data, it forms inaccurate associations or biases, which can lead to unfair or flawed outcomes. In the hands of Adaptive AI, which continuously evolves with new data, this misinformation becomes more potent and potentially more harmful, impacting areas like hiring, lending, and even criminal justice. 4. Model Inversion: Peeking Inside the Locked Box Adaptive AI models can be thought of as locked boxes that take in questions and provide answers, without revealing their internal workings. Model inversion, however, is akin to a burglar discovering how to unlock that box, reconstructing the sensitive data that was used for training. This exposure could compromise private information, especially if sensitive health, financial, or personal data was involved, posing significant privacy risks. ConclusionThe evolving intelligence of Adaptive AI brings as much risk as it does reward. As it advances, we must remain vigilant and proactive in addressing the hidden dangers, from data leaks and poisoning to manipulation and inversion risks. Safeguarding against these threats is essential to ensure Adaptive AI not only grows smarter but also operates responsibly, securely, and fairly in our digital future.
The Three Dilemmas : Choice, Control & Intelligence – DevOps Leaders Face When Scaling Continuous Delivery Pipelines
In the age of digital transformation, scaling continuous delivery (CD) pipelines has become essential for businesses striving for agility and competitiveness. However, DevOps managers often find themselves in a balancing act, facing multiple dilemmas that can impact the efficiency of their pipelines. These dilemmas can be broadly categorized into Choice, Control, and Intelligence. Understanding and addressing these challenges is critical for fostering sustainable growth and delivering high-quality software at scale. 1. The Dilemma of Choice: Choosing the Right Tools and Technology Stack One of the first dilemmas DevOps leaders face is making the right choices about the tools and technologies that will power their continuous delivery pipeline. The market is saturated with options for CI/CD platforms, containerization, orchestration tools, and cloud services. While choice offers flexibility, it also creates complexity. Picking the wrong tool could lead to vendor lock-in, scalability bottlenecks, or inefficient processes. For example, a DevOps manager may need to choose between open-source CI/CD tools like Jenkins, which provides flexibility but requires heavy customization, or managed services like GitLab CI or CircleCI, which offer ease of use but may not be as customizable. Another growing trend is the adoption of GitOps for declarative infrastructure management, but organizations often struggle to determine if it suits their unique scaling needs. Solution:To overcome the choice dilemma, leaders should: 2. The Dilemma of Control: Balancing Standardization and Autonomy The second dilemma arises around control—balancing the need for standardization with the autonomy required by individual teams. As the organization grows, it’s tempting to standardize tools, processes, and environments to ensure consistency and reduce risk. However, excessive control can stifle innovation and agility, especially when diverse teams have differing needs. Consider a scenario where a DevOps team has standardized its pipeline on a certain cloud provider’s services for deployment. However, a new development team, working on an experimental project, wants to leverage a different technology stack, such as Kubernetes on-premises or a multi-cloud strategy. Imposing strict control over tool choices can lead to friction between innovation and governance. Solution:To address the control dilemma: 3. The Dilemma of Intelligence: Leveraging Data for Decision-Making The third dilemma is intelligence—leveraging data effectively to make informed decisions about the performance and reliability of the CD pipeline. With pipelines spanning multiple tools and environments, gathering actionable insights across the stack can be challenging. Leaders must decide which metrics matter most, such as deployment frequency, lead time, and failure rates, while avoiding the trap of analysis paralysis. For example, a team may gather vast amounts of data from their CI/CD pipeline (build times, test results, deployment success rates) but struggle to correlate this data to business outcomes. Should the focus be on speeding up deployments, or is it more critical to reduce failure rates? Without the right intelligence, it becomes difficult to prioritize improvements. Solution:To handle the intelligence dilemma: Conclusion Scaling continuous delivery pipelines is no easy feat, and DevOps leaders must navigate the dilemmas of choice, control, and intelligence. By carefully selecting tools that align with long-term goals, striking a balance between standardization and team autonomy, and utilizing data to drive decision-making, organizations can successfully scale their pipelines while maintaining agility and quality. Addressing these dilemmas head-on not only improves the scalability and efficiency of CD pipelines but also fosters a culture of innovation, where teams can continuously deliver value to end users.