Connecting a Flask Application to AWS RDS (MySQL)
Project Description Amazon Web Services (AWS) provides a managed SQL database service called Amazon Relational Database Service (Amazon RDS). Amazon RDS uses various database engines to manage the data, migrations, backup, and recovery. In this project, we will create a database instance of SQL over RDS. After that, we will create a key pair value, use a security group and make an EC2 instance using Amazon Machine Image (AMI). Then, we’ll use the endpoint of that database to connect it with the EC2 instance and install the required packages for the Flask application. In the end, we’ll deploy the Flask application on EC2 and connect the application to use the AWS RDS (MySQL) database. The AWS Command Line Interface (CLI) is a powerful utility to manage all AWS services through a shell prompt. You can use the CLI to access and configure various AWS services and automate tasks using scripts. For your convenience, the AWS CLI has been downloaded and installed using the official link Verify that the utility is properly configured by running the following command: When you’ve successfully run this command, you’ll see the version details of the AWS CLI. This ensures that the AWS CLI has been installed correctly. Use the following command to list all commands available through the AWS CLI: Press the “Q” key to exit and return to the shell prompt. Note: In this project, you’ll create and export some environment variables using the environment.sh bash script. Step 2: Configuration: To configure the AWS account, run the configure command available through the AWS CLI and enter credentials, region, and output format. A few sample regions available in the AWS CLI are listed in the following table: Region Name Region US East (Ohio) us-east-2 US East (N. Virginia) us-east-1 US West (N. California) us-west-1 Some sample output formats available through AWS CLI are shown below: Note: It’s recommended to create a new AWS AccessKeyId and SecretAccessKey by creating a new IAM User for this project. To learn how to generate these keys, follow this link. Make sure to set up the AmazonEC2FullAccess user policy for the IAM user. Type the following command in the terminal: After executing this command, add the following parameters: Step 3: Create a New RDS Amazon Web Services (AWS) provides managed SQL database services the called Amazon Relational Database Service (Amazon RDS). Amazon RDS provides various database engines to manage the data, migrations, backup, and recovery. Let’s create a new database using the aws rds command. Add the following parameters while creating a new RDS: After creating the RDS instance, assign the value of VpcSecurityGroups.VpcSecurityGroupId to the SG_ID variable in the environment.sh file. After adding the value to the file, use the following command to export the value: source environment.sh Step 4 : Describe DB Instances Use the aws rds command to list all DB instances associated with the AWS account. After describing the RDS instance, assign the value of Endpoint.Address to the RDS_ADDRESS variable in the environment.sh file. Note: The endpoint may take some time to show up because instances created in the previous task will take some time to be initialized. Run the following: source environment.sh Step 5: Add a New Inbound Rule to the Security Groups The security group has some default inbound and outbound rules. MySQL that will be running on port 3306. The inbound rule will specify the port number and IP range of the incoming traffic that the EC2 security group will allow. Add an inbound rule to the security group with the following parameters: Add two more inbound rules to access the EC2 with SSH and the Flask application. Use a command from aws ec2 to add these three inbound rules to the security group. Type the following command to add an inbound rule for Flask: Type the following command to add an inbound rule for SSH: Step 6: Create a New Key Pair In AWS, a key pair is a combination of public and private keys. The public key is encrypts data, while the private key decrypts data. These are the security credentials used to connect to the EC2 instance. Amazon EC2 instance stores the public key, and the user has their private key to connect to the instance. Let’s create a new key pair in the account using the aws ec2 command. You need to pass a key name to the command to create a key pair. The name of the key pair must be unique. Step 7: List all Key Pairs Let’s verify the creation of key pairs by listing all available key pairs in the account using the aws ec2 command. Step 8: Run an EC2 Instance Let’s launch a template using Amazon Machine Image (AMI) in this task. You can only launch instances of those AMIs for which you have permission. To launch an instance, get the AMI ID of the required operating system. Add the AMI ID in the AMI_ID variable in the environment.sh file. Use the following command to export the value: source environment.sh After getting Amazon Ubuntu’s AMI ID, use the aws ec2 command and pass these parameters to launch the instance: Type the following command to run an instance: After running the instance, copy the InstanceId from the output and assign it to the INSTANCE_ID variable in the environment.sh file. Use the following command to export the values: Step 9: Check the state of the EC2 instance After running an instance, we can check the state of the instance using the aws ec2 command. This will accept the InstanceId as the argument and output the complete details of the instance. Check the PublicIpAddress and State.name of the instance. If the state is not running, wait for a while and list the attributes of the instance again. After two minutes, notice the status of the instance again. It should be in running now. Note: Copy the PublicIpAddress of the instance and place it in the environment.sh file in the PUBLIC_IP. Next, export the variable using the following command: source environment.sh Step 10: Copy the Data from a Local Machine to EC2 machine: To deploy the Flask application over the EC2 instance, upload the application from a local machine to the EC2 instance. In this task, perform the following steps: GitHUB: https://github.com/skillupwithsachin/aws_rds_project_skill_up_with_sachin.git https://github.com/skillupwithsachin/aws_rds_project_skill_up_with_sachin# Type the following command to change the access permission of the file: Use the following command in the terminal to upload the zipped Flask application: After these commands,
AWS EC2 Status Checks: An Overview

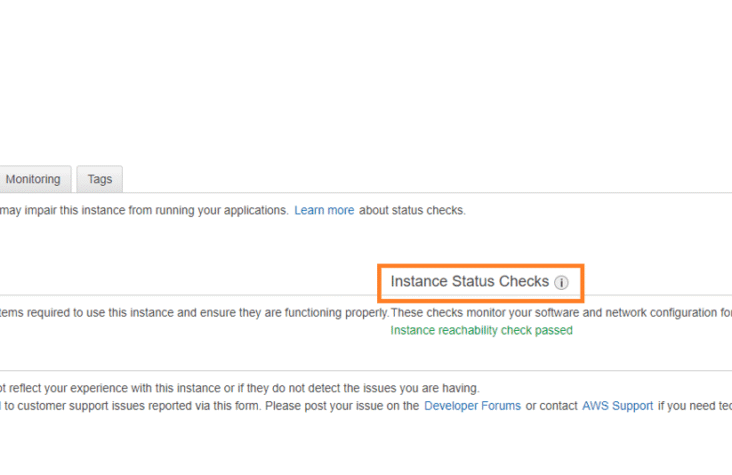
AWS EC2 status checks are automated health checks that monitor the functionality and operability of your EC2 instances. They provide crucial insights into the state of the underlying hardware, network connectivity, and the operating system of the instance. These checks are fundamental to ensure the high availability and reliability of your workloads on AWS. Types of EC2 Status Checks Default Configuration of Status Checks By default, status checks are enabled for every EC2 instance upon launch. These checks are configured and managed by AWS automatically. The results of these checks are visible in the AWS Management Console under the “Status Checks” tab of an EC2 instance, or via the AWS CLI and SDKs. Can We Modify Default Configuration? AWS does not provide options to directly alter the predefined system and instance status checks. However, you can customize the handling of failed checks by configuring CloudWatch Alarms: Defining Custom Health Checks While AWS EC2 status checks focus on the infrastructure and OS-level health, you might need additional monitoring tailored to your application or workload. This is where custom health checks come in. Here’s how to implement custom checks: sudo yum install amazon-cloudwatch-agentsudo vi /opt/aws/amazon-cloudwatch-agent/etc/amazon-cloudwatch-agent.json Example configuration snippet: { “metrics”: { “append_dimensions”: { “InstanceId”: “${aws:InstanceId}” }, “metrics_collected”: { “disk”: { “measurement”: [“used_percent”], “resources”: [“/”] }, “mem”: { “measurement”: [“used_percent”] } } }} Start the cloudwatch agent:sudo /opt/aws/amazon-cloudwatch-agent/bin/amazon-cloudwatch-agent-ctl -a start Example: Status Check Handling Scenario: Automate recovery when a system status check fails. { “Version”: “2012-10-17”, “Statement”: [ { “Effect”: “Allow”, “Action”: [“ec2:RebootInstances”], “Resource”: “*” } ]} 2. Create a CloudWatch alarm: 3. Test: Interview Questions and Answers
Understanding AWS EC2 Instance Classes: Demystifying M and R Instances

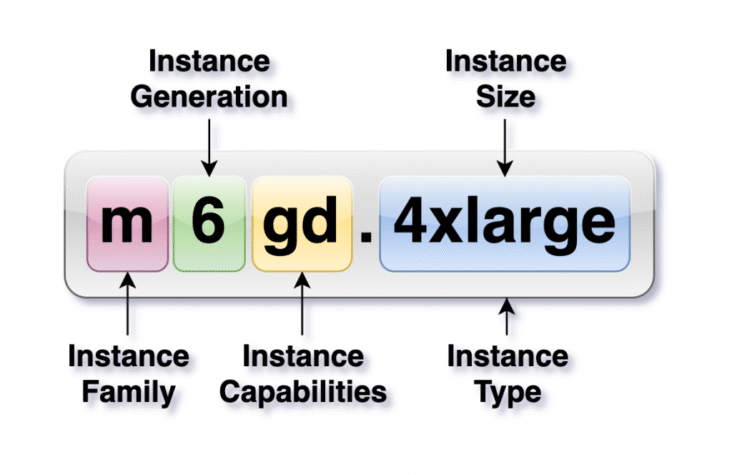
When it comes to AWS EC2 instances, many developers, engineers, and interviewees often struggle to clearly explain the difference between instance classes like M and R. These instances are essential in optimizing resource allocation and improving performance in the cloud. However, misconceptions around what these classes stand for and their use cases can lead to confusion. In this detailed guide, we’ll dive into the key differences between instance classes and types, focusing on M and R instances, to help build a clearer understanding — whether you’re preparing for an AWS interview or just seeking to enhance your AWS knowledge. What Are EC2 Instance Classes? Before we get into M and R instances specifically, let’s first understand the concept of instance classes. An EC2 instance class refers to a family or group of instances designed to meet specific resource needs for particular workloads. AWS organizes its instances into classes based on performance characteristics, which enables users to select the best instance for their requirements. Each class is tailored to optimize specific resources like memory, computing power, storage, or networking performance. Here are some common EC2 instance classes: Instance Types vs. Instance Classes An important distinction to make when discussing EC2 instances is the difference between instance types and instance classes. Knowing both the class and the type is critical when choosing the right instance for your workload, as the specific type within a class may be better suited for your needs. Breaking Down M Instances: General Purpose Workhorse M instances are AWS’s General Purpose instances, and they are designed to provide a balance between CPU, memory, and network performance. These instances are ideal for workloads that require a relatively even distribution of resources and don’t lean heavily on one particular resource like memory or CPU. Use Cases for M Instances M instances are commonly used for: R Instances: Memory-Optimized Performance R instances, on the other hand, are part of AWS’s Memory-Optimized instance class. These instances are designed to handle workloads that require a significant amount of memory. If your application deals with large datasets that need to be processed in-memory or requires high-speed access to memory, R instances are your best bet. Use Cases for R Instances R instances are well-suited for memory-intensive applications like: Key Differences Between M and R Instances While M and R instances may appear similar at first glance, their main difference lies in the optimization of resources: The choice between M and R instances should be based on your workload requirements. If your application needs balanced performance, M instances are the way to go. But if your application is memory-intensive and requires large amounts of memory for processing data, R instances are the better choice. Why This Matters for Interviews and Real-World Scenarios Asking about M and R instances in interviews helps test a candidate’s ability to understand AWS resource allocation at a deeper level. It’s not just about remembering that “M is for memory” (which is actually incorrect!) — it’s about understanding how to choose the right instance class for specific workloads. For interviews, knowing the difference between instance classes shows a deeper understanding of AWS’s capabilities. Employers want to see that you’re not just memorizing terms but understanding how to apply AWS resources efficiently in real-world scenarios. For practical use, understanding instance classes and types helps optimize your application’s performance and cost-efficiency in the cloud. Selecting the wrong instance class could lead to unnecessary expenses or suboptimal performance. Here are some examples of commonly used AWS EC2 instance classes and their specific use cases: These examples illustrate how different classes address specific resource needs (CPU, memory, storage), allowing you to tailor your AWS environment to the demands of your workload. Do you know what is the class for t2.micro instance and why it is used ? The T2.micro instance belongs to the T class, specifically the T2 family of Burstable Performance instances. These instances are designed to provide a baseline level of CPU performance with the ability to burst when needed. The T2.micro instance is ideal for low-traffic applications, small databases, or development and testing environments. It offers 1 vCPU and 1 GB of RAM, and it’s commonly used in AWS’s free tier for light workloads that don’t require consistent, high CPU usage.
Do you know how DNS works ?

Ever wondered how a simple click on a website URL leads you to a beautifully designed webpage? Let’s dive into the world of DNS! Let’s understand with this pictorial representation how DNS works actually. Step-by-Step Process: Related Questions and Answers: Q1: What is a DNS Resolver? Q2: What role does the Root Nameserver play in DNS resolution? Q3: Why is caching important in DNS resolution? Q4: What happens if the Authoritative Nameserver is down? Q5: Can DNS resolution fail? If so, why? This process is fundamental to how the internet works, allowing users to access websites using human-readable domain names instead of numerical IP addresses.
AWS S3 : All you need to know about S3

AWS S3 is crucial for storage as it offers scalable, durable, and secure object storage. It provides benefits like unlimited storage capacity and high availability, enabling easy access to data from anywhere, anytime. To know more about S3 and how the S3 Lifecycle works, watch this tutorial. Subscribe to my channel for more such videos. AWS S3 (Simple Storage Service) is a powerful cloud storage solution that provides highly scalable, durable, and secure object storage. It offers benefits such as unlimited storage capacity, cost-effective pricing models, and high availability. With S3, you can easily store and retrieve any amount of data at any time, from anywhere on the web. One of the key features of AWS S3 is the S3 Lifecycle, which allows you to manage your objects so that they are stored cost-effectively throughout their lifecycle. This feature enables automated transitions between different storage classes based on defined rules, helping you optimize costs while ensuring that your data is always available when needed. Key Benefits of Amazon S3: S3 Lifecycle Policies: Managing Data Cost-Effectively One of the powerful features of S3 is its lifecycle management capabilities. S3 Lifecycle Policies enable you to define rules to automatically transition objects between different storage classes or to delete them after a specified period. This is particularly useful for managing storage costs while maintaining the availability and durability of your data. How S3 Lifecycle Works: To dive deeper into the workings of AWS S3 and the S3 Lifecycle management, watch this detailed tutorial. If you’re interested in cloud computing, don’t forget to subscribe to my channel for more insightful videos! Scenario-Based Interview Questions and Answers 1. Scenario: You need to store large amounts of data that is infrequently accessed, but when accessed, it should be available immediately. What S3 storage class would you use? Answer:For this scenario, the S3 Standard-IA (Infrequent Access) storage class would be ideal. It is designed for data that is accessed less frequently but requires rapid access when needed. It offers lower storage costs compared to the S3 Standard class while maintaining high availability and durability. 2. Scenario: You are working on a project where cost optimization is crucial. You want to automatically move older data to a less expensive storage class as it ages. How would you achieve this? Answer:You can achieve this by configuring an S3 Lifecycle Policy. This policy allows you to define rules that automatically transition objects to different storage classes based on their age or other criteria. For example, you can set a rule to move objects from S3 Standard to S3 Standard-IA after 30 days, and then to S3 Glacier after 90 days for further cost savings. 3. Scenario: A critical file stored in S3 is accidentally deleted by a team member. How can you ensure that files can be recovered if deleted in the future? Answer:To protect against accidental deletions, you can enable S3 Versioning on the bucket. Versioning maintains multiple versions of an object, so if an object is deleted, the previous version is still available and can be restored. Additionally, enabling MFA Delete adds an extra layer of security, requiring multi-factor authentication for deletion operations. 4. Scenario: You are dealing with sensitive data that needs to be encrypted at rest and in transit. What options does S3 provide for encryption? Answer:AWS S3 offers several options for encrypting data: Additionally, S3 supports encryption in transit via SSL/TLS to protect data as it travels to and from S3. 5. Scenario: You are managing a large dataset of user-generated content on S3. This content is frequently accessed for the first 30 days but becomes less relevant over time. How would you optimize storage costs using S3 lifecycle policies? Answer: To optimize storage costs, I would implement an S3 Lifecycle Policy that transitions objects from the S3 Standard storage class to S3 Standard-IA (Infrequent Access) after 30 days, as these objects will be less frequently accessed but still need to be available quickly. After 90 days, I would transition the objects to S3 Glacier for long-term archival storage. If the content is no longer needed after a certain period, I could also set an expiration rule to delete the objects after, say, 365 days. 6. Scenario: Your team accidentally uploaded sensitive data to an S3 bucket that should have been encrypted but was not. What steps would you take to secure the data? Answer: First, I would identify and isolate the sensitive data by restricting access to the S3 bucket using an S3 bucket policy or IAM policy. Then, I would use S3’s server-side encryption (SSE) to encrypt the data at rest. If the data needs to remain accessible, I would copy the unencrypted objects to a new bucket with encryption enabled, and then delete the original unencrypted objects. I would also set a bucket policy that enforces encryption for all future uploads to ensure compliance. 7. Scenario: You have a large number of small files in an S3 bucket, and you notice that your S3 costs are higher than expected. What could be causing this, and how would you address it? Answer: The increased costs could be due to the high number of PUT and GET requests, as S3 charges for both storage and requests. To reduce costs, I would consider aggregating small files into larger objects to reduce the number of requests. Additionally, I would evaluate whether S3 Intelligent-Tiering is appropriate, as it automatically moves objects between two access tiers when access patterns change, which could further optimize costs for frequently and infrequently accessed data. 8. Scenario: Your company needs to ensure that critical log files stored in S3 are retained for compliance purposes for at least 7 years. However, they are not accessed frequently. What would be your approach? Answer: I would store the log files in the S3 Glacier storage class, which is designed for long-term archival and offers a lower cost for data that is rarely accessed. To comply with the 7-year retention requirement, I would create an
Do you know, How does AutoScaling Works in AWS ?

AutoScaling in AWS !! It’s a very hot topic and we need to understand how autoscaling happens , how does the load balancer work. Have you ever thought how Netflix, Hotstar and Amazon handle their load in peak hours. They have great scalable architecture with load balancer and multiple components which together helps them to handle the load. In this video, I have talked about Network Load Balancer. Subscribe, Share and Like.
How to Start with AWS – Webinar Event

Watch on my youtube channel a Webinar on Introduction to AWS and Cloud Computing. Sponsored by Being Datum.